Pages

Apr 14, 2014

DIY: Vintage Tin Can

I love to collect cute cans, especially if they're vintage. I have few of them at home, but there was one that really needed a little makeover. I needed a place to storage some of my brushes so I thought it would be a good idea to use that can. I had all the materials so it was quick and super easy.
It took me only few minutes to "dress" this can and give it a new vintage look :)
Below you can see the quick steps and materials.


Me encanta coleccionar latas que sean lindas, especialmente si son vintage. Tengo unas pocas en casa, pero había una que realmente necesitaba que le cambiara un poquito la apariencia. Necesitaba un lugar donde guardar mis brochas, así que pensé que la lata era perfecta para eso. Tenia todos los materiales en casa así que fue super fácil y rápido hacerlo.
Solo me tomo unos minutos "vestir" mi nueva lata con un look vintage :)
Abajo pueden ver los pasos y los materiales.
Materials: Can, floral fabric, lace trim, white paper (to cover the can - 1st layer), glue,
scissors, fabric glue (for better results use hot glue).

You can even use the new can as a flower pot! I love that idea too.
Happy Weekend!


Materiales: Lata, tela floreada, encaje, papel blanco (para cubrir la lata primero), goma (pega), goma para tela (La goma caliente da mejores resultados).
También puedes usar esta lata como macetero o florero, también me encanta esa idea.
Buen fin de semana!

Nov 2, 2009

Bunny ears!!

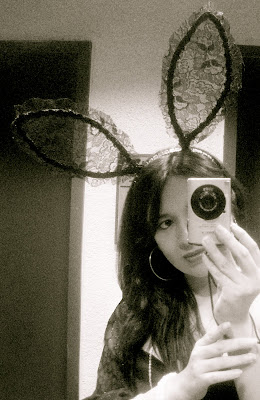
Hope everyone had a wonderful weekend! As I told you on Friday, I wanted to make my own bunny ears for Halloween. I didn't have much plans for Halloween, in fact I didn't even have time to make my own costume, but I really wanted to make my bunny ears and share them with you.
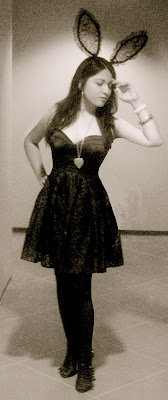
I ended up going to a last minute Halloween party very close to where I live. I arrived there almost at midnight wearing a little black dress and my bunny ears :)
I'm happy because I was able to finish the bunny ears thanks to the tutorial I found on Free people's blog. Here's the link if you want to make them: Bunny ears Tutorial
And here are some of the pics of the bunny ears, hope you like them :)
Thank you all for your lovely comments!
xoxo

*Spanish*
Espero que hayan tenido un super fin de semana! Como les comenté el Viernes, quería hacer mis propias orejitas de conejo para Halloween.
No tenía muchos planes para la noche de Halloween, de hecho ni siquiera tenía un disfraz específico, pero realmente quería hacer mis orejitas y compartirlas con ustedes. A último momento decidí ir a una fiesta de Halloween muy cerca a donde vivo. Llegué casi a la media noche, me puse un mini vestido negro tipo coctel y mis orejitas :) Estaba muy contenta porque pude terminar las orejitas gracias a un tutorial que encontre en el blog de Free People, aqui les dejo el link por si quieren hacerlas: Bunny ears Tutorial
Y aquí les dejo algunas fotos de las orejitas, espero que les gusten :)
Gracias por sus lindos comentarios!
Besos

Starting with the wire and bias tape
Comenzando con el alambre y el forro de tela
Sew the lace to to the ear by hand
Coci el encaje a la oreja a mano
I glued a different trim over the binding
Pegué un trim distinto alrededor
Voila! They're ready to wear now!
Voila! Las orejitas están listas!
Me wearing them ;)
Since they were for Halloween, I made them
a little bigger than the original.
Aquí estoy con ellas. Ya que las iba a usar para Halloween,
las hice un poco más grandes que las originales
This is the LBD I wore.
It's very simple, but I love
the texture on the skirt.
Este es el vestido negro que me puse
es sencillo, pero me encanta la textura
en la falda
Copyright @ BOHO MARKET. Blog Design by KotrynaBassDesign